Recent Posts
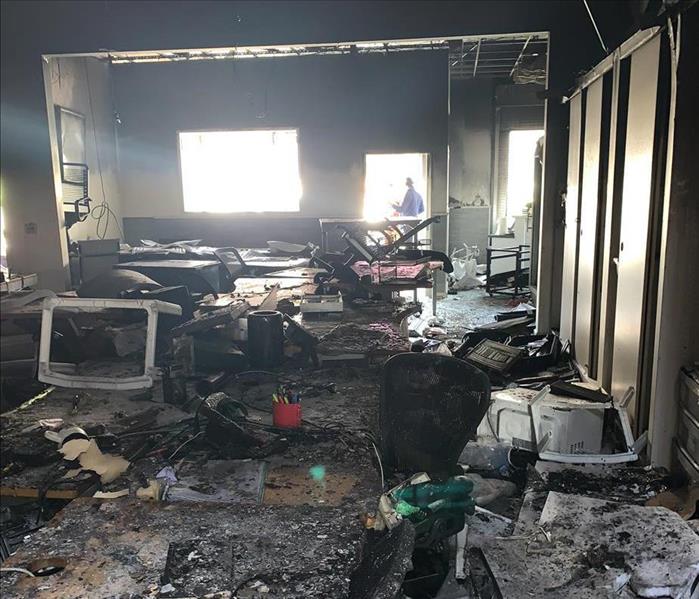
Choosing the Right Fire Restoration Company: Key Factors for a Smooth Recovery
12/4/2024 (Permalink)
Experiencing a fire in your home or business can be devastating. After ensuring everyone’s safety, the next crucial step is to begin the restoration process. However, choosing the right fire restoration company can make all the difference in how smoothly and effectively you recover. A reputable fire restoration company can help you rebuild and restore your property quickly and with minimal stress Here are some key factors to consider when selecting a fire restoration company, and why SERVPRO® should be your go-to choice for fire restoration services.
Look for Certified Professionals
The fire restoration industry is highly specialized, so it’s important to choose a company with the proper certifications. Look for companies that are certified by the Institute of Inspection, Cleaning, and Restoration Certification (IICRC). This ensures that the professionals handling your restoration project are properly trained and adhere to industry standards.
SERVPRO is IICRC-certified and employs trained professionals who use the latest restoration techniques and equipment to ensure the best results for your home or business.
Experience and Expertise
Experience matters when it comes to fire restoration. Companies with years of experience will be better equipped to handle various fire damage scenarios, whether it’s a small kitchen fire or a larger structural blaze. Experienced companies understand the complexities of smoke, soot, and structural damage, and how to best address them.
With decades of experience, SERVPRO is a leader in fire restoration. Our experts have seen it all and know how to navigate the restoration process quickly and efficiently.
Comprehensive Services
Fire damage is rarely limited to just one area of your home. A fire restoration company should offer a full range of services, from initial damage assessment to soot and smoke removal, water damage restoration (from firefighting efforts), structural repairs, and content restoration. The more comprehensive the services, the less you’ll need to rely on multiple companies to handle different parts of the restoration.
SERVPRO provides a complete suite of fire restoration services, including emergency board-up, soot and odor removal, water extraction, and structural repairs. We can even help restore personal belongings affected by the fire.
Fast Response Time
Time is of the essence when it comes to fire damage restoration. The longer soot and smoke are left untreated, the more extensive the damage can become. Choose a company that offers 24/7 emergency response services and can begin restoration efforts as soon as possible.
SERVPRO is available 24/7, ensuring that we can be on-site quickly to mitigate damage and begin the restoration process.
Insurance Coordination
Dealing with insurance companies can be overwhelming, especially after a fire. Look for a restoration company that can help you navigate the claims process. A reputable company will work directly with your insurance provider to make the process as seamless as possible.
SERVPRO has established relationships with many major insurance companies and can help you handle the paperwork and documentation required for your claim.
Positive Reviews and Testimonials
Before selecting a fire restoration company, check online reviews and testimonials from past clients. Look for consistent feedback about professionalism, responsiveness, and quality of work. While a few negative reviews are normal, a pattern of poor customer service should be a red flag.
Choosing a reputable fire restoration company is crucial to ensuring a smooth recovery process after a fire. Look for certified professionals with experience, comprehensive services, fast response times, and a solid reputation. SERVPRO meets all these criteria and more, making us a trusted partner in fire damage restoration. When disaster strikes, you can count on SERVPRO of Colorado Springs Southeast to help restore your property and peace of mind.
Drying Techniques: Air Movers, Dehumidifiers, and Mo
10/16/2024 (Permalink)
 If you’re facing water damage, trust SERVPRO.
When dealing with water damage, quick and effective drying is essential to prevent further issues like mold growth or structural weakening. At SERVPRO®, we employ a range of drying techniques tailored to the specific needs of each situation. In this blog, we'll explore the key tools and methods we use to ensure your property is thoroughly dried and restored.
The Power of Air Movers
Air movers, also known as blowers or fans, are one of the most critical tools in our drying arsenal. These machines work by creating a high-velocity airflow across surfaces, which helps to accelerate the evaporation of moisture. When water infiltrates your home or business, it often seeps into flooring, walls, and furniture. Air movers are strategically placed to target these areas, ensuring that moisture is drawn out and into the air where it can be removed.
The key to effective use of air movers is placement. Our trained technicians understand the dynamics of airflow and use this knowledge to position air movers in a way that maximizes drying efficiency. This process is especially crucial in large or complex spaces where moisture might be trapped in hard-to-reach areas.
The Role of Dehumidifiers
While air movers focus on increasing the rate of evaporation, dehumidifiers are essential for removing the moisture from the air. When water evaporates into the air, it raises the humidity level, which can slow down the drying process and potentially cause secondary damage. Dehumidifiers work by drawing in moist air, cooling it to condense the water vapor, and then expelling dry air back into the space.
We utilize two main types of dehumidifiers: refrigerant and desiccant. Refrigerant dehumidifiers work by cooling the air to condense moisture, much like an air conditioner. Desiccant dehumidifiers, on the other hand, use a moisture-absorbing material to remove water from the air. Depending on the extent of the water damage and the environmental conditions, our team will choose the most appropriate type of dehumidifier to ensure effective drying.
Specialty Drying Equipment
In addition to air movers and dehumidifiers, we also use a variety of specialty drying equipment designed to handle specific challenges. For instance, Injectidry systems are used to dry behind walls or under flooring without requiring significant demolition. These systems work by forcing dry air into cavities where moisture is trapped, speeding up the drying process in hidden spaces.
Another tool we use is the thermal imaging camera, which helps us identify moisture pockets that may not be visible to the naked eye. This technology allows us to target these areas with precision, ensuring no moisture is left behind.
Effective drying is crucial in the restoration process, and at SERVPRO, we have the tools and expertise to ensure your property is dried thoroughly and efficiently. From air movers and dehumidifiers to specialized equipment, our approach is designed to restore your space to its pre-damage condition as quickly as possible. If you’re facing water damage, trust SERVPRO to use the best drying techniques to safeguard your property.
The difference between fire damage and smoke damage restoration
8/14/2024 (Permalink)
 For more information on our fire and smoke damage restoration services, contact SERVPRO today. We're here to help you every step of the way.
When a fire disrupts your home or business, the aftermath can be overwhelming. Understanding the difference between fire damage and smoke damage is crucial in taking the right steps towards restoration. At SERVPRO®, we specialize in both fire damage and smoke damage restoration, providing comprehensive solutions to help you return to normalcy as quickly as possible.
Fire Damage Restoration
Fire damage involves the destruction directly caused by flames. This type of damage can be extensive, affecting the structure, walls, ceilings, and floors. It can also impact the contents of the building, from furniture to personal belongings. The restoration process for fire damage typically includes the following steps:
- Assessment and Inspection: Our experts conduct a thorough assessment to determine the extent of the damage. This helps us create a detailed restoration plan.
- Board-Up and Roof-Tarp Services: To secure your property and prevent further damage, we provide board-up services and roof tarping.
- Water Removal and Drying: Firefighting efforts often result in water damage. We use specialized equipment to remove water and thoroughly dry the affected areas.
- Soot and Smoke Removal: Using advanced techniques and cleaning agents, we remove soot and smoke residues from surfaces and contents.
- Cleaning and Sanitizing: We clean and sanitize all restorable items and structures, including deodorization to eliminate smoke odors.
- Restoration and Reconstruction: The final step involves restoring your property to its pre-fire condition. This may include minor repairs, such as replacing drywall, painting, or major reconstruction efforts.
Smoke Damage Restoration
Smoke damage, while less obvious than fire damage, can be equally destructive. Smoke particles can penetrate various materials and linger long after the fire is extinguished. The restoration process for smoke damage includes:
- Inspection and Smoke Damage Assessment: We start by evaluating the extent of smoke damage. This helps us identify the type of smoke residue and the best cleaning methods.
- Immediate Board-Up and Roof-Tarp Services: Just like with fire damage, securing your property is a priority to prevent additional issues.
- Soot and Smoke Residue Cleaning: Different types of smoke require different cleaning methods. Our technicians are trained to handle wet smoke, dry smoke, protein smoke, and fuel oil smoke.
- Odor Removal: Smoke odors can be pervasive and challenging to eliminate. We use industrial air scrubbers and fogging equipment to remove airborne particles and deodorize affected areas.
- Cleaning of Contents and Belongings: Personal belongings and furniture are carefully cleaned and deodorized. In some cases, we use off-site cleaning methods to restore your items.
- Final Restoration: Similar to fire damage restoration, we complete the process by restoring your home or business to its pre-smoke condition.
Why Choose SERVPRO?
At SERVPRO, we understand the complexities of fire and smoke damage restoration. Our highly trained professionals use state-of-the-art equipment and techniques to provide efficient and effective solutions. With our 24/7 emergency services, we are always ready to help you during your time of need. Trust SERVPRO to restore your property and peace of mind.
For more information on our fire and smoke damage restoration services, contact SERVPRO today. We're here to help you every step of the way.
Tornado Preparedness 101: Protecting Your Family and Property
7/31/2024 (Permalink)
As part of the SERVPRO® team, I understand the importance of being prepared for any disaster, especially tornadoes. These powerful storms can strike with little warning, causing extensive damage to homes and posing significant risks to families. With the right preparedness plan, you can protect your family and property, ensuring safety and minimizing damage.
Understanding Tornado Warnings and Alerts
The first step in tornado preparedness is understanding the different types of tornado alerts. The National Weather Service (NWS) issues tornado watches and warnings. A tornado watch means that conditions are favorable for tornadoes to develop, while a tornado warning means a tornado has been sighted or indicated by weather radar. It's crucial to have a reliable way to receive these alerts, such as a weather radio, smartphone app, or local news station.
Creating a Tornado Safety Plan
Every household should have a tornado safety plan in place. Start by identifying a safe room in your home where everyone can seek shelter during a tornado. The best options are basements or storm cellars. If these are not available, choose an interior room on the lowest floor, away from windows, such as a bathroom or closet. Ensure that all family members know where to go and conduct regular drills to practice your plan.
Assembling an Emergency Kit
An emergency kit is essential for tornado preparedness. This kit should include basic supplies to sustain your family for at least 72 hours. Key items include bottled water, non-perishable food, a flashlight, extra batteries, a first-aid kit, medications, important documents, and sturdy shoes. Store your emergency kit in your designated safe room for easy access during an emergency.
Protecting Your Property
There are several steps you can take to protect your property from tornado damage. Secure loose items around your yard, such as patio furniture, grills, and lawn ornaments, as these can become dangerous projectiles in high winds. Trim trees and remove dead branches to reduce the risk of falling debris. Reinforce your home's structure by installing storm shutters, securing your roof, and reinforcing garage doors. Additionally, consider investing in a tornado shelter if you live in a high-risk area.
Staying Informed and Connected
Staying informed about the weather conditions in your area is crucial for tornado preparedness. Monitor local weather reports and stay connected with community alert systems. Make sure all family members know how to use emergency communication tools, and establish a plan for reuniting if separated during a tornado.
After the Storm
Once the tornado has passed, it's essential to assess the safety of your environment before beginning any cleanup. Check for downed power lines, gas leaks, and structural damage. Contact SERVPRO for professional assistance with storm damage cleanup and restoration. Our team is equipped to handle the aftermath of tornadoes, providing you with peace of mind and helping you get back to normal as quickly as possible.
Tornado preparedness is a critical aspect of protecting your family and property. By understanding tornado alerts, creating a safety plan, assembling an emergency kit, protecting your property, staying informed, and knowing what to do after the storm, you can significantly reduce the risks associated with these powerful storms. At SERVPRO, we are here to support you every step of the way, ensuring you and your loved ones stay safe and your property remains protected.
Kitchen Mold: How to Prevent and Eliminate It
7/17/2024 (Permalink)
Welcome to the SERVPRO® blog! Today, we're tackling a common household issue that can be a real headache: kitchen mold. Mold is not only unsightly but can also pose risks and damage to your home if left unchecked. Fortunately, there are steps you can take to prevent and eliminate mold in your kitchen.
- Keep it Dry: Mold thrives in damp environments, so it's crucial to keep your kitchen dry. After cooking or washing dishes, wipe down countertops, sinks, and any other surfaces that may have gotten wet. Fix any leaks promptly to prevent water from accumulating.
- Ventilation is Key: Proper ventilation is essential for preventing mold growth. Use exhaust fans while cooking or showering to remove excess moisture from the air. If your kitchen doesn't have a built-in exhaust fan, consider installing one or opening windows to allow fresh air to circulate.
- Clean Regularly: Regular cleaning can help prevent mold from taking hold in your kitchen. Pay special attention to areas prone to moisture, such as under the sink, around the refrigerator, and behind appliances. Use a mixture of water and detergent to scrub surfaces and remove any mold spores that may be present.
- Seal Grout and Caulk: Mold often grows in the cracks and crevices of grout and caulk. To prevent this, regularly inspect and repair any damaged grout or caulk in your kitchen. Consider applying a sealant to these areas to create a barrier against moisture and mold growth.
- Monitor Humidity Levels: High humidity levels can create an ideal environment for mold to thrive. Invest in a hygrometer to monitor the humidity levels in your kitchen and take steps to reduce them if necessary. Using a dehumidifier can help keep humidity levels in check, especially in areas with poor ventilation.
- Store Food Properly: Mold can also grow on food, so it's important to store it properly to prevent contamination. Keep perishable items refrigerated and store dry goods in airtight containers to prevent moisture from getting in.
- Address Water Damage Immediately: If your kitchen experiences any water damage, whether from a leaky pipe or a spilled glass of water, it's crucial to address it immediately. Dry the affected area thoroughly and consider hiring a professional restoration service, like SERVPRO, to ensure that mold does not have a chance to take hold.
By following these tips, you can help prevent mold from becoming a problem in your kitchen. However, if you do discover mold in your home, it's essential to address it promptly to prevent further damage. SERVPRO is Here to Help® with professional mold remediation services, so don't hesitate to contact us if you need assistance. Remember, when it comes to mold, prevention is key!
5 Home Maintenance Tips to Prevent Expensive Repairs
6/12/2024 (Permalink)
 By following these five home maintenance tips, you can protect your property and avoid costly repairs.
As homeowners, it's crucial to stay proactive when it comes to maintaining our homes. Regular maintenance not only helps keep your property in top condition but also prevents major repairs down the line. Here are five tips to help you stay ahead of potential issues and avoid costly repairs:
1. Regularly Clean Gutters and Downspouts
Clogged gutters and downspouts can lead to water damage, roof leaks, and foundation issues. Make it a habit to clean your gutters at least twice a year, ideally in the spring and fall. Remove leaves, debris, and any other obstructions to ensure proper water flow and drainage away from your home's foundation.
2. Inspect and Seal Windows and Doors
Leaky windows and doors can result in energy loss and water leaks, leading to mold growth and structural damage. Check for gaps, cracks, or deteriorating seals around windows and doors, and replace or repair them as needed. Consider adding weatherstripping or caulking to improve energy efficiency and prevent drafts.
3. Test and Maintain Your HVAC System
Your heating, ventilation, and air conditioning (HVAC) system plays a crucial role in maintaining indoor comfort and air quality. Schedule regular inspections and maintenance services to ensure optimal performance and efficiency. Change air filters regularly, clean vents and ducts, and address any issues promptly to prevent costly repairs or breakdowns.
4. Monitor Plumbing Fixtures and Pipes
Leaky faucets, toilets, and pipes can waste water and cause water damage to your home. Keep an eye out for signs of leaks, such as dampness, water stains, or increased water bills. Repair or replace faulty plumbing fixtures and pipes to prevent water waste and potential water damage.
5. Maintain Your Roof and Inspect for Damage
Your roof is your home's first line of defense against the elements, so it's essential to keep it in good condition. Inspect your roof regularly for signs of damage, such as missing shingles, cracked flashing, or sagging areas. Address any issues promptly to prevent water leaks, mold growth, and structural damage.
By following these five home maintenance tips, you can protect your property, avoid costly repairs, and ensure your home remains a safe and comfortable place for you and your family. And remember, if you ever need assistance with home restoration or repairs, SERVPRO of Colorado Springs Southeast is here to help with expert services tailored to your needs.
Busting The Top 6 Lightning Myths
5/15/2024 (Permalink)
Lightning is a powerful force of nature that often leads to misconceptions about its behavior and effects. In this blog post, we're debunking 6 common myths about lightning to help you better understand this natural phenomenon and stay safe during thunderstorms.
Lightning Never Strikes the Same Place Twice
Contrary to popular belief, lightning can strike the same location multiple times. Tall structures, such as buildings and trees, are more likely to be struck by lightning due to their height and conductivity. It's essential to take lightning safety precautions regardless of whether a location has been struck before.
Rubber Soles Protect You from Lightning
While rubber-soled shoes provide insulation against electrical currents on the ground, they offer little to no protection against a direct lightning strike. If you're caught outdoors during a thunderstorm, seek shelter in a sturdy building or a hard-topped vehicle to stay safe from lightning strikes.
Only Metal Objects Attract Lightning
While metal objects are more conductive and can attract lightning strikes, they are not the only targets. Lightning can strike any object that offers a path of least resistance to the ground, including trees, water, and even people. Avoid standing near tall objects or bodies of water during thunderstorms to reduce the risk of being struck by lightning.
You're Safe Inside a House During a Thunderstorm
While being indoors provides some level of protection from lightning strikes, it's essential to take precautions to stay safe. Avoid using corded electronics or plumbing fixtures during thunderstorms, as lightning can travel through electrical wiring and plumbing systems. Stay away from windows, doors, and concrete walls, which can conduct electricity from lightning strikes.
Cars Are Always Safe During Thunderstorms
While cars provide a degree of protection against lightning strikes due to their metal framework, it's essential to follow safety guidelines. Avoid touching metal surfaces inside the car and refrain from using electronic devices connected to the car's electrical system. If possible, pull over to a safe location and turn off the engine during severe thunderstorms.
You're Safe from Lightning Indoors if You're Not Near Windows
While staying away from windows reduces the risk of injury from shattered glass during lightning strikes, it doesn't guarantee safety from electrical hazards. Lightning can travel through wiring, plumbing, and metal framing in buildings, potentially causing electrical fires or shock hazards. Follow lightning safety guidelines indoors and avoid using corded electronics or plumbing fixtures during thunderstorms.
By debunking these common lightning myths, we hope to raise awareness about the importance of lightning safety and help you make informed decisions during thunderstorms. Remember to seek shelter indoors during thunderstorms, avoid high-risk activities, and follow lightning safety guidelines to protect yourself and your loved ones from the dangers of lightning strikes. If your home sustains damage from a lightning strike or severe weather, don't hesitate to contact SERVPRO® for professional restoration assistance.
Fire vs. Smoke Damage Restoration – What You Need to Know
4/15/2024 (Permalink)
 Dealing with the aftermath of a fire can be overwhelming.
Dealing with the aftermath of a fire can be overwhelming, and understanding the nuances between fire damage and smoke damage restoration is essential for a smooth recovery process. In this blog, we're breaking down the key distinctions between these two types of damage restoration, shedding light on the unique challenges each poses and the specialized approaches needed for effective restoration.
Fire Damage Restoration
When it comes to fire damage, the destruction is often visible and extensive. From charred structures to melted materials, the aftermath of a fire can be daunting. Fire damage restoration involves the comprehensive cleanup and reconstruction of the affected areas. Our skilled technicians assess the structural damage, remove debris, and initiate repairs to restore your property to its pre-fire condition. This process demands precision and expertise, addressing both the visible and hidden consequences of the flames.
Smoke Damage Restoration
Smoke damage, on the other hand, presents a set of challenges that extend beyond what meets the eye. Smoke particles can infiltrate various surfaces, leaving behind stubborn odors and residues. Smoke damage restoration involves a meticulous cleaning process to eliminate soot and smoke residues from walls, ceilings, and other affected surfaces. Specialized equipment is employed to address the invisible particles that may have penetrated porous materials. Additionally, odor removal techniques are crucial to ensure a complete restoration, as lingering smoke smells can persist long after the visible damage is gone.
Understanding the Combined Approach
In many cases, fire and smoke damage go hand in hand. A thorough assessment is conducted to identify the extent of the damage, enabling our team to formulate a tailored restoration plan. Combining the expertise needed for fire damage and smoke damage restoration ensures that your property is not only structurally sound but also free from lingering odors and residues.
Distinguishing between fire damage and smoke damage restoration is crucial for a targeted and effective restoration process. Whether you're facing the visible aftermath of a fire or dealing with the pervasive effects of smoke, our technicians at SERVPRO® are equipped to handle both aspects with precision and care. Understanding these differences empowers homeowners to navigate the restoration process with confidence, ensuring a comprehensive recovery that goes beyond surface-level repairs. If you find yourself in need of fire or smoke damage restoration, don't hesitate to reach out – we're Here to Help® you restore your property to its preloss condition.
How Can I Get Rid of Mold in My Bathroom?
3/11/2024 (Permalink)
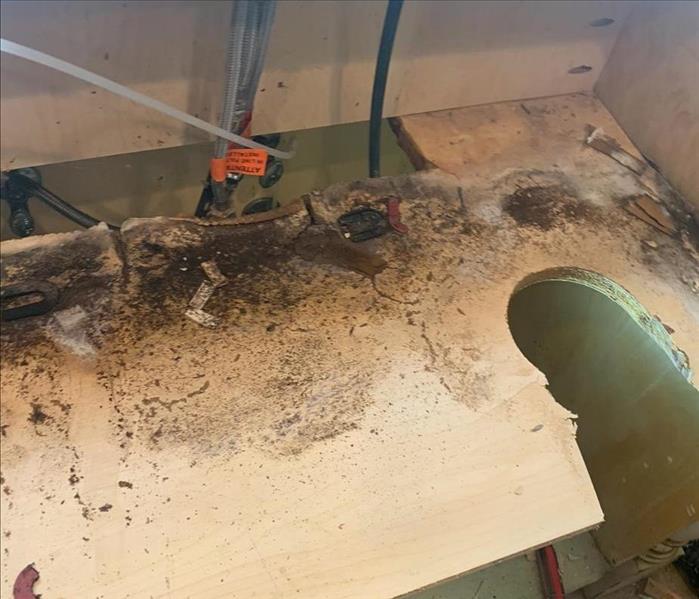 Saying goodbye to mold in your bathroom doesn't require complex strategies – just practical measures and a proactive approach.
Your bathroom, a place of hygiene and relaxation, can often fall victim to an uninvited guest – mold. Fear not, for as an expert in the field, we are here to guide you through the steps to prevent and clean mold in your bathroom. No fancy terms or complex strategies, just practical methods to prevent mold infestations.
1. Identify the Moisture Source
Mold and moisture go hand in hand. Start by identifying and addressing the source of moisture in your bathroom. Leaky pipes, poor ventilation, or lingering dampness can be common culprits. Fixing these issues is the foundation for preventing mold from making a comeback.
2. Ventilate, Ventilate, Ventilate
Bathrooms are notorious for inadequate ventilation, creating an ideal breeding ground for mold. Improve air circulation by using exhaust fans during and after showers, opening windows, or installing a dehumidifier. Proper ventilation not only discourages mold but also enhances the overall air quality in your bathroom.
3. Regular Cleaning
A simple yet effective method is regular cleaning. Use a mold-fighting solution to scrub away visible mold. Pay extra attention to areas prone to moisture, such as shower curtains, grout lines, and the under the sink. A routine cleaning regimen keeps mold at bay.
4. Dry Surfaces Promptly
Preventing mold is all about moisture control. Ensure that surfaces, especially around the shower and sink, are dried promptly after use. Wipe down wet areas, fix any leaks promptly, and invest in quality bath mats to absorb excess moisture.
5. Seal Grout Lines
Grout lines between tiles are prime real estate for mold growth. Seal them regularly to create a mold-resistant barrier. This simple step not only enhances the aesthetics of your bathroom but also prevents mold from finding a foothold.
6. Fix Leaks Promptly
Leaky faucets or pipes are like an open invitation for mold. Address any leaks promptly to prevent water from accumulating in hidden areas. A quick fix not only conserves water but also acts as a powerful preventive measure against mold growth.
7. Natural Light and Mold
Natural light is an unsung hero in the battle against mold. Keep your bathroom well-lit during the day to harness the sun's natural mold-fighting properties. Sunlight not only deters mold growth but also adds a refreshing ambiance to your space.
In conclusion, saying goodbye to mold in your bathroom doesn't require complex strategies – just practical measures and a proactive approach. Identify and eliminate moisture sources, improve ventilation, clean regularly, dry surfaces promptly, seal grout lines, fix leaks, and embrace the power of natural light. With these steps, you can transform your bathroom into a mold-free space, ensuring a clean and healthy area for your daily routines.
Safeguarding Your Well-being: Essential Tips for Personal Safety During Water Damage Cleanup
1/17/2024 (Permalink)
Water damage cleanup is a challenging and potentially hazardous task that requires careful consideration for personal safety. Whether caused by a flood, burst pipe, or plumbing issue, it is crucial to prioritize self-protection during the cleanup process. In this blog, we will discuss essential guidelines to safeguard yourself when dealing with water damage in your home.
Prioritize Safety Precautions
Before starting the cleanup process, ensure you have proper personal protective equipment (PPE), including gloves, boots, goggles, and a mask. These items will protect you from contaminated water, mold spores, chemicals, and other debris present during the cleanup.
Water and electricity are a dangerous combination. Before entering the affected area, shut off the power to prevent electrical shock. If you are unsure of how to do this safely, it is best to consult a professional electrician.
Assess Structural Stability
Water damage can compromise the structural integrity of your home. Before beginning cleanup, thoroughly assess the stability of the walls, ceilings, and floors. If you notice sagging, cracks, or signs of collapse, evacuate and seek professional assistance immediately.
Mold can develop within 24-48 hours after water damage occurs. To prevent the spread of mold spores, ensure proper ventilation by opening windows and using fans. Use dehumidifiers to control moisture levels and remove wet materials promptly to impede mold growth.
Proper Water Extraction and Decontamination
If the water damage is extensive, consider hiring professional water damage restoration experts like SERVPRO®. They have the equipment and expertise to safely extract water and thoroughly decontaminate the affected areas, reducing the risk of microbes and harmful substances.
Properly dispose of damaged materials in sealed bags to prevent contamination and avoid spreading mold or other hazardous substances. Thoroughly clean all surfaces with antimicrobial solutions, ensuring they are thoroughly dry to discourage mold growth.
Seek Professional Assistance
For severe or extensive water damage, it is advisable to consult a professional restoration company like SERVPRO. Their trained technicians have the knowledge and tools to handle the cleanup process safely and efficiently, ensuring optimal results. Take photographs and videos of the damage before and during the cleanup process. This documentation will be crucial for insurance claims and can help in the restoration efforts.
Regular Maintenance and Prevention
To minimize the risk of future water damage, perform regular maintenance tasks such as inspecting and repairing plumbing, cleaning gutters, and ensuring proper ventilation. Prevention is key to avoiding the need for future cleanup and potential hazards.
Water damage cleanup requires careful attention to personal safety. Following the guidelines mentioned above, such as wearing appropriate protective gear and seeking professional assistance when needed, will help ensure your well-being during the cleanup process. Prioritizing safety is essential to protect yourself and your loved ones while restoring your home to its preloss condition.
 24/7 Emergency Service